Styrene Building?

R2-D2 Builder’s Club Info

The founder of the R2-D2 Builder’s Club, Dave Everitt, actually built his droid out of styrene. I am actually having second thoughts about the clear plastic dome. I am still probably going to go with it, but the styrene dome still has a lot of potential and I would feel bad about missing out on mentioning it.

All domes fit the frames – as long as you use the standard plans – so I don’t have to change my frame size.


Dome

The Styrene Dome part run is located here. 


Frame

The Styrene Frame blueprints are located here. Note – you will need an app like 7-Zip or WinRar. 

More Electronics & Parts Info

Well, I have been doing some more browsing on the R2-D2 Builder’s Club and have looked through some awesome threads about electronics. One guy on the forums, Mrivorey, posted a thread about his wiring diagram for his droid. I thought I should have a look at it, and here is the info I learnt from them:


FROM THIS THREAD


NOT INCLUDED: Dome Electronics, Audio Amp, Servos, etc.


PARTS

*These parts may have sold out, but they may be back as another part run. Or I can just get them from another store!


In other news, I am planning to put a deposit in for the SENNA CS:R Frame within two months.


Dome Research Ep. 1

Well…I have been doing some more research over the past couple of hours and mainly on the dome. A really good build log that I found that documented starting off the dome really well is located here.

The clear dome that we are going to be using will look a bit like this when we are finished with it:

 asdfghjkjhgfds

The aluminium dome that Frank uses looks like this (with the radar eye):

P1040712

Frank cleans the dome with 0000 steel wool and dish soap.


CLEAR DOME RESEARCH


Images


cleardomepic0cleardomepic1


See here for the blog


This dome has a diameter of 16 cm – it is a mini R2-D2 project. But the tutorial the guy shows is important to follow because it helps me with my dome, as he used a clear dome to start with.

In the last image, you see it is colored in. I want to have some panels that remain clear so you can sort of see the ‘inner workings’ of our droid.


A good way of making the dome look like most of it is metal is to have a sort of skin – sort of like the skins that you can find at the R2-D2 Builder’s Club.

The skin should be easy enough to make, I just need to get some metal, like aluminium. I could probably enquire on the R2-D2 Builder’s Club Forums.

MARS Props Composite Skirt

Hey all, I have just been looking at this post on the R2-D2 Builder’s Club forums and I decided to have a look at it. I am going to buy this skirt (probably), so I had better do some research. I included it in my Parts List entry, and it should be a good buy.

Because of the current exchange rate between America & Australia, the skirt costs about $241.09 AUD.

Here are the tools & materials that I will need to use:

  1. Epoxy (I feel 5 min kicks off too quickly, if you use this work fast, chill in the fridge for 8 hours before using to extend time)
  2. CA Glue
  3. x4 1/4 20 screws
  4. Sandpaper
  5. Favorite Power tools

Instructions:

  1. Remove the flash from the edges of the skirt and the base plate. I may need to use a dremel if some of the flash is thicker. The base plate will only fit 1 way. This is done on purpose. Sand down the base plate so that it fits flush into the skirt. It doesn’t HAVE to be perfect, but a dip into the skirt is better than part of the base plate sticking up above the rim of the skirt. Also the flash can be sharp, and if it is all sanded smooth like you will have less blood in your R2.
  2. Remove the flash around the bolt holes. You want these flush on both sides.
    1. Make it flush on both sides. Pro tip, mark the left and right and front side of the base plate on the bottom. The base plate will ONLY fit one way.
  3. Position the base plate on the frame where it should be oriented. You should also place the skirt on top of the baseplate to get a better visual.
  4. I used some masking tape to secure the baseplate once I had it lined up. I should also test it with the skirt on it to make sure it looked right. Look at it from different angles. The skirt is NOT the same diameter as the frame base. This is normal.
  5. Use a marker or automatic center punch or screw etc to mark the location of the holes and then drill (in the case of a wood/styrene frame) a Com8-B frame you can skip this step. I recommend drilling a pilot hole first and then drilling the final hole. When you drill the final hole drill it out a tad bigger than the bolt so you have a bit of room to adjust the fitment of the skirt.
    1. Test fit the baseplate and bolts and skirt.
  6. Grind down the inside of the contact areas for the base plate on the skirt it self.
  7. Put the bolts into the baseplate from the underside of the plate so that the bolts become studs that sit above the base of the skirt and the head of the bolt is inside the skirt when it is bonded. I should use a lock washer on it. Then test fit again onto the droid.
  8. Permanently bond the bolts to the base plate only after you have tested everything. Make sure the bolts are going up the right way!!! I will use superglue and put some on the threads, then I will put more around the base of the bolt and let it cure. I will not use an accelerator because I want to get a stronger bond. Once the glue is dry, I  will reapply it. The choice of the glue is arbitrary. I could use epoxy, fiberglass resin etc.
  9. Next is bonding the skirt and the base plate. I will wrap masking tape around the lip the the skirt. This is to protect it from any spills with the epoxy I am going to use to bond it together. Before applying the tape it would use the cleaning agent (I will use acetone). The wax and grease remover would be better especially for painting later on. But make sure it is cleaned before bonding, bot the skirt and base should be cleaned.
  10. Bonding. Here you I use superglue (expanding or gel would work better, polyester fiberglass resin, epoxy etc). All will bond with the material. I should have already sanded the contact areas, and cleaned them. I should use 5 min epoxy. I will not use a piece of cardboard to mix the epoxy. That would a mistake, at least 25% of the epoxy would be absorbed into the cardboard. Use foil or something. I will use the whole tube.

The skirt will have bonded after finishing these 10 steps.

Parts List 2.0

I have succeeded in making an excel spreadsheet for our parts list. We have included information for:

  • Electronics:
    • MarcDuino’s
    • Controllers
    • Bluetooth
    • Drives
    • Motors
  • Body & Frame:
    • Skins
    • Skirts
    • Shoulder Hubs
    • SENNA CS:R frame parts
  • Dome
  • Legs:
    • SENNA CS:R LEGS
  • Tools:
    • LAZY SUSAN
    • Hinges Kit

The total price is about $3,191.85 AUD, and we have not included everything we could possibly need, but it is a good start. I have color-coded the parts in order of priority.

At my school, a lot of the tools have already been accounted for. When I am working with my relatives over east, a lot of the tools have been accounted for.

Parts List – EXCEL – Dropbox

S.H.A.D.O.W. (M.D) Controller

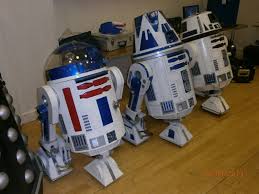
What is the Shadow Controller?

The SHADOW controller is going to be a big part of our droid. The S.C. controls the R2 sounds, volume, lights, holoprojector movement, etc. I recently learnt about a version of the controller that would work with the MarcDuino’s. 
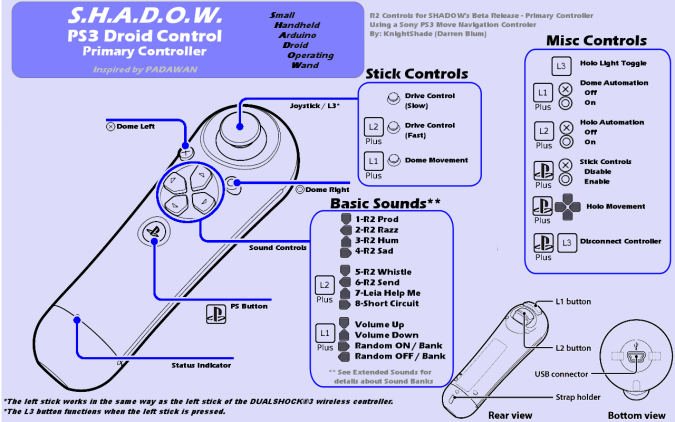
Controls & range

The Shadow controller is based off of the Play Station controller, and it is quite similar, although the structure is actually more like the Wii remote – yes, it is black and has the normal P.S. buttons, but you hold it upright and with one hand!

The code supports two controllers with the beta coding.

ShadowControls-Primary-Beta.png

Shadow Controller & MarcDuino’s

If you look at these pages (M.D. Thread & Wiki Page) you will see some important info about the controller and the MarcDuino’s. 

M.D. Shadow Controller Button Settings

// —————————————————————————————
// MarcDuino Button Settings
// —————————————————————————————
// Std MarcDuino Function Codes:
// 1 = Close All Panels
// 2 = Scream – all panels open
// 3 = Wave, One Panel at a time
// 4 = Fast (smirk) back and forth wave
// 5 = Wave 2, Open progressively all panels, then close one by one
// 6 = Beep cantina – w/ marching ants panel action
// 7 = Faint / Short Circuit
// 8 = Cantina Dance – orchestral, rhythmic panel dance
// 9 = Leia message
// 10 = Disco
// 11 = Quite mode reset (panel close, stop holos, stop sounds)
// 12 = Full Awake mode reset (panel close, rnd sound, holo move,holo lights off)
// 13 = Mid Awake mode reset (panel close, rnd sound, stop holos)
// 14 = Full Awake+ reset (panel close, rnd sound, holo move, holo lights on)
// 15 = Scream, with all panels open (NO SOUND)
// 16 = Wave, one panel at a time (NO SOUND)
// 17 = Fast (smirk) back and forth (NO SOUND)
// 18 = Wave 2 (Open progressively, then close one by one) (NO SOUND)
// 19 = Marching Ants (NO SOUND)
// 20 = Faint/Short Circuit (NO SOUND)
// 21 = Rhythmic cantina dance (NO SOUND)
// 22 = Random Holo Movement On (All) – No other actions
// 23 = Holo Lights On (All)
// 24 = Holo Lights Off (All)
// 25 = Holo reset (motion off, lights off)
// 26 = Volume Up
// 27 = Volume Down
// 28 = Volume Max
// 29 = Volume Mid
// 30 = Open All Dome Panels
// 31 = Open Top Dome Panels
// 32 = Open Bottom Dome Panels
// 33 = Close All Dome Panels
// 34 = Open Dome Panel #1
// 35 = Close Dome Panel #1
// 36 = Open Dome Panel #2
// 37 = Close Dome Panel #2
// 38 = Open Dome Panel #3
// 39 = Close Dome Panel #3
// 40 = Open Dome Panel #4
// 41 = Close Dome Panel #4
// 42 = Open Dome Panel #5
// 43 = Close Dome Panel #5
// 44 = Open Dome Panel #6
// 45 = Close Dome Panel #6
// 46 = Open Dome Panel #7
// 47 = Close Dome Panel #7
// 48 = Open Dome Panel #8
// 49 = Close Dome Panel #8
// 50 = Open Dome Panel #9
// 51 = Close Dome Panel #9
// 52 = Open Dome Panel #10
// 53 = Close Dome Panel #10
// *** BODY PANEL OPTIONS ASSUME SECOND MARCDUINO MASTER BOARD ON MEGA ADK SERIAL #3 ***
// 54 = Open All Body Panels
// 55 = Close All Body Panels
// 56 = Open Body Panel #1
// 57 = Close Body Panel #1
// 58 = Open Body Panel #2
// 59 = Close Body Panel #2
// 60 = Open Body Panel #3
// 61 = Close Body Panel #3
// 62 = Open Body Panel #4
// 63 = Close Body Panel #4
// 64 = Open Body Panel #5
// 65 = Close Body Panel #5
// 66 = Open Body Panel #6
// 67 = Close Body Panel #6
// 68 = Open Body Panel #7
// 69 = Close Body Panel #7
// 70 = Open Body Panel #8
// 71 = Close Body Panel #8
// 72 = Open Body Panel #9
// 73 = Close Body Panel #9
// 74 = Open Body Panel #10
// 75 = Close Body Panel #10
//
// Std MarcDuino Logic Display Functions (For custom functions)
// 1 = Display normal random sequence
// 2 = Short circuit (10 second display sequence)
// 3 = Scream (flashing light display sequence)
// 4 = Leia (34 second light sequence)
// 5 = Display “Star Wars”
// 6 = March light sequence
// 7 = Spectrum, bar graph display sequence
// 8 = Display custom text
//
// Std MarcDuino Panel Functions (For custom functions)
// 1 = Panels stay closed (normal position)
// 2 = Scream sequence, all panels open
// 3 = Wave panel sequence
// 4 = Fast (smirk) back and forth panel sequence
// 5 = Wave 2 panel sequence, open progressively all panels, then close one by one)
// 6 = Marching ants panel sequence
// 7 = Faint / short circuit panel sequence
// 8 = Rhythmic cantina panel sequence
// 9 = Custom Panel Sequence

//———————————
// CONFIGURE: Arrow Up
//———————————
//1 = Use Std MarcDuino Function, 2 = Use Custom Function
int btnUP_type = 1;

// IF Std MarcDuino Function (type=1) – Enter MarcDuino Function Code (1 – 75) (See Above)
int btnUP_MD_func = 12;

// IF Custom Function (type=2) select your CUSTOM SOUND SETTING, LOGIC DISPLAY SETTING, PANEL SETTING

// CUSTOM SOUND SETTING: Enter the file # prefix on the MP3 trigger card of the sound to play (0 = NO SOUND)
// Valid values: 0 or 182 – 200
int btnUP_cust_MP3_num = 0;

// CUSTOM LOGIC DISPLAY SETTING: Pick from the Std MD Logic Display Functions (See Above)
// Valid values: 0, 1 to 8 (0 – Not used)
int btnUP_cust_LD_type = 0;

// IF Custom Logic Display = 8 (custom text), enter custom display text here
String btnUP_cust_LD_text = “”;

// CUSTOM PANEL SETTING: Pick from the Std MD Panel Functions or Custom (See Above)
// Valid Values: 0, 1 to 9 (0 = Not used)
int btnUP_cust_panel = 0;

// IF Custom Panel Setting = 9 (custom panel sequence) update Dome Panel #1 thru #10 below
// Dome Panel #1
boolean btnUP_use_DP1 = false;
int btnUP_DP1_open_start_delay = 1; // in seconds (0 to 30)
int btnUP_DP1_stay_open_time = 5; // in seconds (1 to 30)
// Dome Panel #2
boolean btnUP_use_DP2 = false;
int btnUP_DP2_open_start_delay = 1; // in seconds (0 to 30)
int btnUP_DP2_stay_open_time = 5; // in seconds (1 to 30)
// Dome Panel #3
boolean btnUP_use_DP3 = false;
int btnUP_DP3_open_start_delay = 1; // in seconds (0 to 30)
int btnUP_DP3_stay_open_time = 5; // in seconds (1 to 30)
// Dome Panel #4
boolean btnUP_use_DP4 = false;
int btnUP_DP4_open_start_delay = 1; // in seconds (0 to 30)
int btnUP_DP4_stay_open_time = 5; // in seconds (1 to 30)
// Dome Panel #5
boolean btnUP_use_DP5 = false;
int btnUP_DP5_open_start_delay = 1; // in seconds (0 to 30)
int btnUP_DP5_stay_open_time = 5; // in seconds (1 to 30)
// Dome Panel #6
boolean btnUP_use_DP6 = false;
int btnUP_DP6_open_start_delay = 1; // in seconds (0 to 30)
int btnUP_DP6_stay_open_time = 5; // in seconds (1 to 30)
// Dome Panel #7
boolean btnUP_use_DP7 = false;
int btnUP_DP7_open_start_delay = 1; // in seconds (0 to 30)
int btnUP_DP7_stay_open_time = 5; // in seconds (1 to 30)
// Dome Panel #8
boolean btnUP_use_DP8 = false;
int btnUP_DP8_open_start_delay = 1; // in seconds (0 to 30)
int btnUP_DP8_stay_open_time = 5; // in seconds (1 to 30)
// Dome Panel #9
boolean btnUP_use_DP9 = false;
int btnUP_DP9_open_start_delay = 1; // in seconds (0 to 30)
int btnUP_DP9_stay_open_time = 5; // in seconds (1 to 30)
// Dome Panel #10
boolean btnUP_use_DP10 = false;
int btnUP_DP10_open_start_delay = 1; // in seconds (0 to 30)
int btnUP_DP10_stay_open_time = 5; // in seconds (1 to 30)

Electronics Ep. 1

BARZALOU’s set-up

On his build log, he talks about his electronics set-up. He is planning on using the MarcDuino’s with the Teeces Logic Lights with a PS2 controller. The R2-Touch app will be incorporated with his controller. 

I am thinking that I may want an xBox controller, as I use the xBox at home. But both will work!

DANOMITE4047’s Padawan 360 Controller

On this thread, Danomite4047 talks about his new controller set-up. This seems like a pretty good idea to me.

The xBox One controller does NOT work with the current set-up:

Quote:

I believe the latest USB library supports the Xbox One controller. I’m not sure if it is USB only or if they support the USB wireless dongle or not. I haven’t researched it.

To answer your direct question – in it it’s current state, no, it does not work with the Xbox One controller.

Sent from my SAMSUNG-SM-G930A using Tapatalk

Cont.

I am going to ask Danomite4047 if the Padawan 360 controller will work with the MarcDuino’s.